

- 17:57
- 0 Comments

- 12:00
- 3 Comments

Ja, auch in der Weihnachtszeit gibt es Geburtstagskinder, die vielleicht nicht schon wieder eine Weihnachtskarte haben wollen ;) Daher habe ich Julias Sketch vom letzten Wochenende zum Anlass genommen, ein paar Geburtstagskarten zu basteln und meine Papierrestekiste etwas ihrer Last zu befreien...
- 15:32
- 2 Comments

- 10:13
- 2 Comments

War das nicht ein herrliches Wochenende? Und das nach dem Schnee der vorangegangenen Woche... Viel gebastelt habe ich nicht, aber glücklicherweise bin ich vorbereitet: Denn heute startet bei danipeuss.de eine neue Sketchwoche! Jeden Tag wird ein neuer Sketch sowie Umsetzungen des Designteams vorgestellt. Ursprünglich sind dies zwar Layout-Sketche, jedoch hindert das uns Kartenbastler natürlich nicht daran, sie auch für unsere Zwecke zu adaptieren und in Kartenform zu zwingen ;)
- 10:32
- 3 Comments
Bei dieser Karte gibt es eigentlich gar nicht viel zu tun: etwas Stanzen und Embossen, das war's. Und falls ihr keine passende Stanzform habt, könnt ihr auch einfach ein paar Wellen mit der Schere schneiden und die Bäume und Häuser mit einem weißen Gelstift malen. Wenn die Schrift eures Stempels nicht zu streng ist, sollte das eine gute Alternative sein.
This card doesn't need many steps, just a bit of die-cutting and embossing, that's it. And if you don't have a fitting die, simply use your scissors and paint some trees and houses with a white gel pen. If the script of your sentiment isn't too stiff (I hope that's the right word), that works well enough.
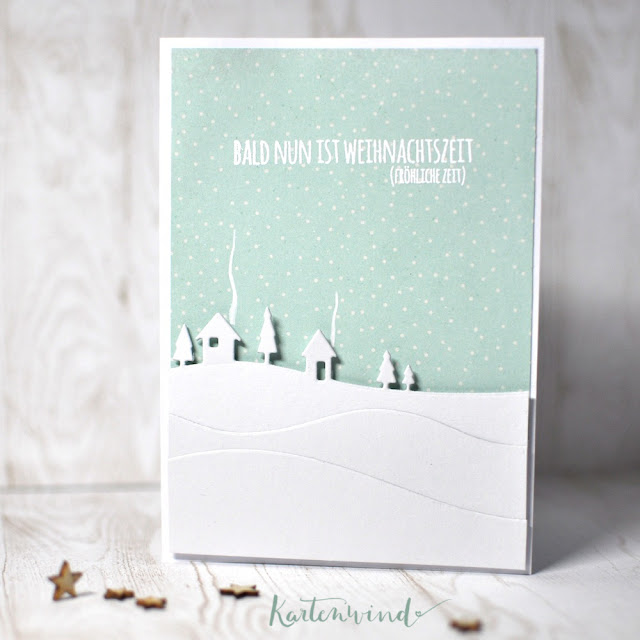

This card doesn't need many steps, just a bit of die-cutting and embossing, that's it. And if you don't have a fitting die, simply use your scissors and paint some trees and houses with a white gel pen. If the script of your sentiment isn't too stiff (I hope that's the right word), that works well enough.


Anleitung:
- Designpapier in Kartengröße zurechtschneiden, auf Kartenrohling kleben
- Bordüren ausstanzen, wenigstens eine Reihe mit Bäumen oder Häusern (siehe Tipp oben)
- Bordüren versetzt übereinander kleben, um Tiefe zu erzeugen
- Spruch mit Embossingpulver stempeln und weiß embossen
- Vordergrund mit 3D Abstandsklebepads im unteren Drittel aufkleben
- Rauchfahnen mit weißem Gelstift einzeichnen
How-to:
- cut patterned paper to fit card base, glue to card base
- die-cut borders, at least one with trees or houses (see tip above)
- adhere borders on top of each other to create depth
- stamp and emboss sentiment
- adhere foreground with foam pads in the lower third
- draw trails of smoke with a white gel pen
Material:
- Papier und weißer Sakura Gelly Roll Stift: Weihnachtskartenkit 2015
- Stempel: Klartext Clear Stamp "Warme Grüße"
- Stempelkissen: Tsukineko Versamark Embossing Ink
- Embossingpulver: aus einem alten Karten-Kit
- Werkzeug: Heißluftfön, Sizzix Big Shot
- Stanzform: von Memory Box (alternativ "Circle Forest Scene", Poppystamp "Stitched Landscapes", Lawn Fawn "Forest Border", My Favorite Things "Tree Line")
- Kleber: 3D Abstandsklebepunkte, Flüssigkleber
- 16:41
- 0 Comments

Bambi durfte auch mitspielen. Ein schönes winterliches Element, was auch noch gut zum Papier passte. Die Schleife des Sketches habe ich im Schal aufgegriffen, was witzigerweise auch wieder dem Papier entspricht. Mir gefällt die Karte (Lieben Gruß an Wiebke ;) ).
Bambi got to play, too. It's a nice and wintery element that matches the patterned paper. And I added the bow in form of the scarf, which correlates to the paper once again :)

Anleitung:
- Designpapier in Kartengröße zurechtschneiden
- Reh ausstanzen und mit Wasserfarben kolorieren, ggf. mehrmals (ich habe die Übergänge mit Wasser und einem Pinsel abgeschwächt)
- Bambi ein paar Highlights mit Embossingstift hinzufügen, mit platin Embossingpulver bestreuen und erhitzen (Hufe, Punkte und Nase)
- aus dem Hintergrundpaper Rechteck mit einem Cutter Messer und Metallineal ausschneiden (oder ausstanzen, wenn man eine passende Stanze hat)
- ausgeschnittenen Bereich mit Transparentpapier hinterlegen
- optional: Ränder des Papiers nähen
- Grußtext auf einen Papierstreifen stempeln und embossen
- Schal mit Gelmedium verstärken: mit Fingern Gel Medium auf Bakers Twine auftragen
- Faden um den Hals des Rehs legen, solange Gel Medium noch nicht getrocknet ist, und in gewünschte Form bringen
- Reh mit 3D Abstandsklebepunkten auf Transparentpapier kleben
- mit weißem Gelstift (Kit) Sterne auf Vellum malen
- Textstreifen mit 3D-Punkten aufkleben
- Karte auf Kartenrohling kleben
How-to:
- cut patterned paper to fit card base
- die-cut deer, color it using watercolors and soften the look with a watery brush
- add highlights on the die-cut deer with an embossing pen and add platinum embossing powder (hooves, dots and nose), heat emboss
- using a cutter and a steel ruler cut a rectangle out of the patterned paper (you could die-cut it, too)
- add a matching piece of vellum to the back of the patterned paper
- optional: sew borders of the paper
- stamp and heat emboss sentiment onto a strip of paper
- use gel medium to strengthen a piece of twine (that's going to be the scarf): use your fingers to put gel medium along the baker's twine
- twirl twine around the deer's neck before it's dry, form it the way you want it to be
- put foam adhesive on the back of the deer, adhere it to the card
- using a white gel pen add stars to the vellum
- adhere sentiment strip with foam dots
- glue paper to card base
Material:
- Papier, Vellum, weißer Sakura Gelly Roll Stift, Baker's Twine: Weihnachtskartenkit 2015
- Stempel: Klartext Clear Stamp "Wunderschöne Weihnachtszeit"
- Stempelkissen: Tsukineko Versamark Embossing Ink
- Werkzeug: Nähmaschine, Cutter, Lineal mit Stahlkante, Heißluftfön, Sizzix Big Shot
- Stanzform: Kesi'Art Métaliks Mini Die "Biche"
- Kleber: 3D Abstandsklebepunkte, Flüssigkleber
- 18:09
- 0 Comments

Warum ich den Gruß auf Vellum gestempelt und embosst habe, weiß ich auch nicht: 1. musste ich deshalb den Text mit dem weißen Gelstift aus dem Kit "ausmalen" und 2. sieht man ein wenig die Klebepunkte durch. Notiz für's nächste Mal...
I don't know why I stamped and embossed the greeting onto vellum: 1. I had to color the text using the white Sakura Gelly Roll pen and 2. you can see those foam pads shining through. Note to self for next time...

Anleitung:
- Größe des Designpapiers anpassen, sodass es Kartenrohling entspricht
- passend geschwungene Streifen Transparentpapier mit Schere zuschneiden (etwas schmaler als Kartenrohling), ggf. vorher Schablone aus Papier fertigen
- Vellum fixieren (z.B. mit Vellum Kleber - anderen sieht man durch - oder Klammern) und aufnähen
- Spruch mit Embossingtinte stempeln und Platin Embossingpulver heiß embossen
- optional (wenn du dafür Transparentpapier genutzt hast...): Spruch etwas deutlicher hervorheben, indem du ihn weiß ausmalst / nachschreibst
- Abdruck ausschneiden, Abstandsklebepunkte darunter kleben
- etwas Garn wild zu einem Knäuel dorthin auf die Karte legen, wo Sprechblase sein wird
- Sprechblase auf Karte kleben, dabei wird Garn ebenfalls befestigt (wer sicher gehen will, kann das Garn vorher mit etwas Kleber dort fixieren, wo er später von der Sprechblase verdeckt sein wird)
How-to:
- cut patterned paper to fit card base
- cut vellum into strips using scissors (a tad smaller than the card base); make a mask out of scratch paper beforehand if necessary
- fix vellum (using vellum glue tape - other will shine through - or binder clips) and sew it onto background
- stamp sentiment using embossing ink, heat emboss with platin embossing powder
- optional (if you used vellum like me...): highlight sentiment by coloring it with a white gel pen
- fuzzy cut embossed image, put foam pads underneath
- ball some thread and put it where the sentiment is going to be
- adhere sentiment onto card, that fixes the thread too (if you want to be sure, you could fix the thread with glue where it will be covered by the sentiment)
Material:
- Papier, Vellum und WOW! Embossingpulver Platin: Weihnachtskartenkit 2015
- Werkzeug: Bulldog Clips, Ranger Heat Tool, Nähmaschine, Schere, Garn
- Stempelkissen: Tsukineko Versamark Embossing Ink
- Stempel: Klartext Stempel "Warme Grüße"
- Kleber: 3D Abstandsklebepunkte
Challenges:
- Christmas Card Challenges: #49 Anything Goes
- Simon Says Monday Challenge: Something with "N" >> nonlinear
- 16:38
- 8 Comments
Oh, auf diese Woche freue ich mich schon eine ganze Weile: Auf danipeuss.de startet die Weihnachtskarten-Sketchwoche!
I've been excited for this event for quite a while: Today starts a whole week of Christmas card sketches on danipeuss.de!

Bis nächsten Sonntag gibt es jeden Tag einen neuen Sketch für eure Weihnachtskarten - und da wir heute schon anfangen, sind es gleich 8 an der Zahl. Selbstverständlich mit schönen Karteninspirationen des Design Teams.
Die Kartensketche sind so ausgelegt, dass ihr sie wunderbar mit dem Weihnachtskartenkit 2015 basteln könnt. Julia hat damit echt schöne Karten gewerkelt. Die will ich am liebsten alle gleich nachbasteln ;) Aber das dann vielleicht später. Ich habe auch vor, zu möglichst allen Sketchen euch eine Karte zu zeigen. Mal sehen, ob das meine Zeit hergibt...
Until next sunday we'll be posting a new Christmas card sketch every day - and as we're starting today, you'll get 8 of them. And of course with lots of card inspirations of the Design Team.
Those sketches are designed to match the Christmas Card Kit 2015. Julia crafted beautiful cards using the kit and the card sketches. I want to lift them all right away ;) But that's for a later date. I, too, want to show you cards to all the sketches (hopefully - we'll see if I've enough time to get them ready on time...). Let's take a look at the first Christmas card sketch:
Aber schauen wir uns doch erstmal den 1. Weihnachtskarten-Sketch an:

- 09:24
- 12 Comments
Heute startet bei danipeuss eine neue Challenge, die endlich auch an uns Kartenbastler gerichtet ist: die dp Kartenchallenge. Alle zwei Wochen wird samstags eine neue Herausforderung gestellt und unter allen Teilnehmern ein 15€ Einkaufsgutschein verlost. (Die genauen Teilnahmebedingungen findest du hier.)
Today starts a new challenge at danipeuss.de, one that is aimed at us card crafters: it's called dp Kartenchallenge. Every two weeks on saturday a new challenge will be posted and one lucky participant will win a 15€ gift voucher. (You can find the conditions of this challenge at the dp blog.) We're getting started with a card sketch.
Auch bei dieser Karte habe ich mich an die Wasserfarben gewagt. Ich mag einfach diesen soften Look von Aquarellfarben, auch wenn das Ergebnis nicht unbedingt dem entspricht, was ich mir zunächst vorgestellt hatte (z.B. hier mal erfolgreich, bei dieser Karte weniger...). Das Kolorieren des Lotusblüten-Stempel ging ganz gut - prima. Aber dann ging das Schieben los.. Wie setze ich das Dreieck? Und wohin das Sentiment? Ihr glaubt nicht, wie lange ich hier geschoben habe... bis ich letztlich ein paar Blätter ausgestanzt und teilweise mit Aquarellfarben koloriert habe. Puh..
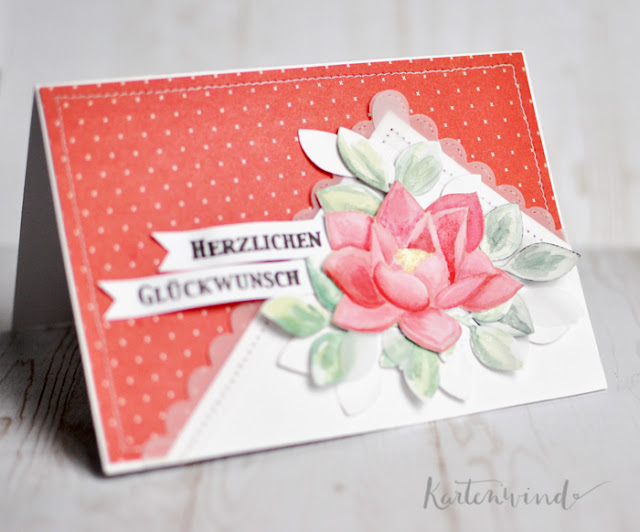

Bei meiner zweiten Karte habe ich ein altes Papier von My Mind's Eye benutzt, das eine Bordüre hat. Auf diese Weise konnte ich schnell vier Karten basteln, die vielseitig einsetzbar sind. Nur noch eine Schleife, ein paar Enamel Dots mit Irresistible Spray und eine Naht am Rand, das war's.
For my second card I used an old designer paper by My Mind's Eye that has a die-cut border. That way you can easily get four cards done that are pretty versatile. All it needs as an embellishment is a bit of ribbon, some irresistible enamel dots and a sewn border.


Ich konnte euch hoffentlich ein wenig animieren, euch auch an die Kartenchallenge zu wagen - bis zum 15. habt ihr Zeit :)
Hopefully I was able to encourage you to participate in this card challenge - you can submit your cards until October 15th.
On this card I wanted to add something watercolored, too. I like the soft look of it, even if I don't get the result that I wanted in the first place (see a surprisingly successful card and one not so much). So I colored the lotus flower with watercolors, which went well. Then I started pushing the elements around, trying to arrange my card. Where should I put the triangle? Where the sentiment? You wouldn't believe how long I sat there, moving everything around... In the end I die-cut a few leaves, colored some of them with watercolors and placed them under the flower. Phew..


For my second card I used an old designer paper by My Mind's Eye that has a die-cut border. That way you can easily get four cards done that are pretty versatile. All it needs as an embellishment is a bit of ribbon, some irresistible enamel dots and a sewn border.


Ich konnte euch hoffentlich ein wenig animieren, euch auch an die Kartenchallenge zu wagen - bis zum 15. habt ihr Zeit :)
Hopefully I was able to encourage you to participate in this card challenge - you can submit your cards until October 15th.
Material:
- Papier: dp Oktober 2015 Kartenkit, Vellum
- Embellishment: Tsukineko Irresistible Texture Spray, Band
- Stempel: Waffle Flower Stamp "Lotus", Klartext Stempel "absolut großartig" (Kit)
- Farben: Ranger Archival Ink "Jet Black", Wasserfarben
- Werkzeug: Paper Smooches Die "Foliage 1", Lawn Fawn "Stitched Scalloped Borders" Dies, Sizzix Big Shot, Nähmaschine
- 08:49
- 2 Comments


